Posts

Showing posts from 2009

home-made vents for latex cement skirting

Image
Last summer I took a week off work in hopes of completing a few projects, one of which was to build the section of latex cement skirting that would run right along the front walk. As it turned out, it was a terrible week, and the finished skirting, which involved some experimenting, was a big disappointment. For one thing, I used fewer of the pvc studs described in an earlier post (http://papercreteparadise.blogspot.com/2009/05/latex-cement-skirting-for-mobile-home.html ), so the nylon flyscreen was even more prone to stretching and sagging under the weight of the first coat of latex cement. Secondly, I ran out of the little washerless screws I'd been using to attach the flyscreen to the studs, and substituted sheetrock screws I had laying about. I used small pieces of cardboard as washers. This was certainly less expensive, but my little cardboard washers are visible under the latex cement. Third, and most important, I attached vents I'd made from papercrete, which looked ter
Gazebo 5

Image
I finally had the opportunity to work on the gazebo. Inclement weather, early sundowns, and other projects always seem to get the way of adding more papercrete to the structure. The other projects include renovating a 40 year old mobile home (I'm replacing the windows first (two down, ten to go), building a papercrete "sprayer" for use with an air compressor, and, of course, working on polymer sculptures. I'm hoping to post photographs of the mobile home (and new sculptures) as we progress. The trailer has been on our property awhile, and we were going to give it to the in laws to use for storage. But the county will not give us a permit to move a mobile home build prior to 1985 unless it's going to the land fill. Nor will they give a contractor a permit to rewire the thing. We felt it was just too valuable a space to pay someone to haul it to the dump, so we're taking it "off grid" and turning it into a studio. I'm hoping to cover the entire be

Gazebo 4

Image
I've been adding more papercrete to the fence/hardware cloth/chickenwire armature, using small, hand-mixed batches of the sculptue mix, which is cellulose insulation, Portland cement, and joint compound, with no sand. Once this dries I think the armature will be more substantial, and additional layers may be of the "construction" mix using the tow mixer, which will probably go faster. The poles at the entrance will be totems. Since they are upright (and I'll be working "against gravity") I'm going to try fastening the faces to the crete-covered poles with masonry glue and wood screws, and papercreting around them.

Umbrella-gazebo structure 3

Image
The wire armature for the gazebo is almost complete. I couldn't wait, and started daubing papercrete on. I'm interested to see if the armature will be sturdy enough. My pre-soaked cellulose papercrete formula wasn't working out. There was just too much slump. The crete would not stick to the upright armature. So, instead of my usual sculpture mix, I mixed three 2-pound coffee cans of dry cellulose insulation and one can of Portland cement, then added water until it was a damp, thick paste. Then, instead of the powdered joint compound I've been sold on, I added (a big gob) of premixed joint compound. The result, when well mixed by (rubber-gloved) hand, was truly clay-like and stuck well to the chicken wire and hardware cloth. Hope to work more on it tomorrow.

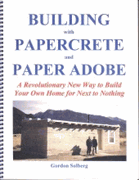
Building with Papercrete and Paper Adobe: An excellent book.

Image
I love this book. It is a beautiful, inspirational compilation of information chock full of grainy b&w photographs of experimental papercrete and paper adobe structures, mixers, etc. There are valuable recipies, speculations, instructions, and considerations, all from guys who have been making stuff out of paper trash, sand, and cement or clay for years now . Well worth the $32 plus shipping I paid for it. I've seen used editions of this book on Amazon.com for as much $120. But your brand new copy is a mere $32 plus shipping at http://papercretenm.com/ .

umbrella-gazebo garden structure 2 -- a work in progress

Image
It doesn't look like much yet. You can barely see the fence wire form, which is almost complete, in the bottom photograph. All but the center post, which is just a 10 ft. 4x4, are made the same way as the armature for the totem pole shown in an earlier post. I had doubts about making the armature this way, thinking I had to wrap a whole 4x4 post with hardware cloth to get a sturdy armature, but the finished totem pole seems incredibly strong, and I was inspired to make the posts for this project the same way. Especially since the "key stone" of this structure is the center post anyway. On the papercrete post, the hardware cloth is tacked to a three foot piece of 4x4 with fence nails. The post extends into the hardware cloth tube approximately one foot, so there are two feet of bare wood at the bottom. The posts are then set so that the hardware cloth is about an inch above ground level. I can go directly over the hardware cloth with papercrete. For the center support, I b

papercrete gazebo structure with latex cement umbrella roof

Image
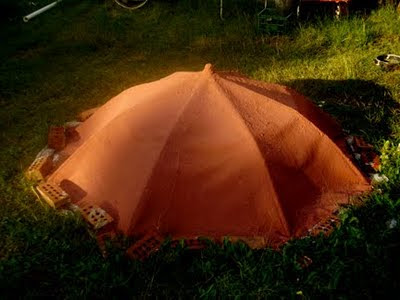
So the neighbor was setting up her patio umbrella to sell at her yard sale and somehow broke the shaft. And I kept thinking that, coated with latex cement (the same stuff with which I made the fly screen skirting for our mobile home as described in an earlier post) it would make a great dome-like roof for a small gazebo. And so I gave her $5 for her broken umbrella and added a papercrete gazebo to my ever-growing "to do" list. Naturally, I didn't photograph the umbrella before I coated it, but here it is after a couple of coats of latex cement.

papercrete totem pole

Image
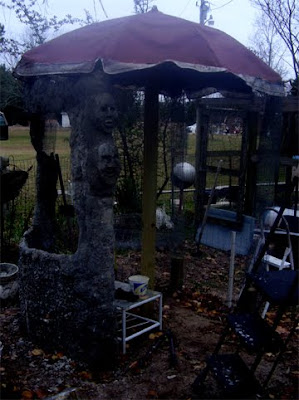
So much for photographing my efforts step by step. I started this totem pole during the heat of the summer and abandoned it for other projects. It's an experiment in that I tacked an eight foot hardware cloth "tube" to a three foot piece of 4x4 instead of wrapping the hardware cloth around a 10 foot post. So the armature is basically a hollow tube of hardware cloth with two feet of wood at the bottom. This made the totem pole less expensive to make. I sculpted the faces with the armature laying under our big sycamore, and became worried it might crack under it's own weight when I tried to lift it. I could imagine it bending and breaking in the middle. It held together well though. I stuck it in the ground to finish the back, which meant more or less plastering it with papercrete and texturing it with an old butter knife. When I made the bottom three faces, I tried mixing all the ingredients (cellulose insulation, cement, and joint compound) dry in a 5 gallon bucket, t
Image
Here is the completed entrance section of the papercrete wall, with arch, gate, and a concrete slab mosaic. The gate is made on a chain-link type gate frame covered with hardware cloth and plastered with papercrete. I mixed it with vermiculite. It's still fairly heavy, and the back is "unfinished," so that you can see the hardware cloth, etc. It's like a stage prop. The wall, of course, is made of papercrete in slip forms over recycled metal fence posts (as discussed in a previous post), then plastered over with more papercrete. The arch was one of those very light metal arbors purchased some years ago at a Dollar General Store and covered in hardware cloth. I layered it once in a papercrete-vermiculite mixture, then set it in place and simply plastered it with many layers of papercrete.

Papercrete Recipes updated September 16, 2014

Image
This update is overdue. My recommendation for papercrete at this point, after a few years of experimentation, would be to start with that good ol' three parts substrate to one part Portland cement mix. Since the days of my mower-towed "mini-mixer" I have dabbled with using cellulose insulation, peat moss, vermiculite, and sand as substrate and have come to rely on the three to one mix, substituting one substrate for another depending on it's use.The recipes I posted years ago made for a weak mix. Two parts paper to one part sand to one part Portland cement would be a better starting place. I mix smaller batches by hand these days. The papercrete wall in the picture is covered with a heavy layer mortar made of sand and Portland cement and laced with either joint compound or builder's lime added for plasticity. Both the wall and the sculpture still stand. Just remember that everything posted here is in the spirit of experimentation. Thanks for reading. Mike

Building A Papercrete Wall, Part 1

Image
What I'm about to say would have probably been obvious in a couple minutes anyway, but I'll go ahead and say it. I know little about building. The angels generally protect me, though they are not beyond letting me spend some extra money. The 8x16 ft. shed I constructed about twenty years ago probably has more wood in it than my house does. If there is ever a tornado, that shed will be the place to go. On the other hand, it's still standing despite it's many structural insufficiencies. Admittedly, I had to replace the roof. Anyway, one day, I know, my luck will probably run out. Meanwhile, I thought I'd try building a wall with papercrete. My footing was some old cement blocks that were laying around. My plan was to drive some old metal fence posts, which were also laying around, through every other hole. The post would support the wall, which I imagined would be light and perhaps a little more flexible than conrete. After I filled in the holes in the blocks with co

building a papercrete wall

Image
I've been building this wall (for months now?) using "slip forms" made from some plywood.

a low rent papercrete mixer

Image
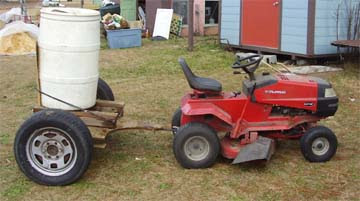
This is a sort of low-rent papercrete mixer that does well for small volumes and might do ever better if I pulled it with my truck instead of my lawn mower. I actually tried it with the truck the first time I used it, but the truck is old and can't take the wear and tear--all that stopping and starting and rolling along at one or two miles per hour--so I just felt more comfortable pulling the mixer around with the lawn mower. I call it low rent because, while most tow mixers involve some welding, this one is made primarily of a piece of fairly thick treated plywood I happened to have laying about from an earlier project. Plywood was not my first choice. I'd been inspired by some guys online who'd made tow mixers out of the rear axels of trucks. One lucky guy in particular told a tale in which the junk man sold him the axel for $25 and, excited by the idea of papercrete, welded the hitch and other metal supports for nothing. I didn't have that kind of luck. The junk yard

Latex-cement skirting for mobile home

Image
It cost about $600 for a guy to install vinyl skirting around our double-wide mobile home. Skirting is a requirement in our county. There was no concrete or other structures to deal with, so our job was a piece of cake for the guy, who just secured the lower track by pushing long nails into the dirt and secured the skirting up top with wood screws. Within the first few months we had covered holes made with our string trimmer with duct tape. Pretty soon there were too many holes to cover. Then the high winds came and and beat the crap out of it--one side completely out of the track and pushed in under the house. I put it back in the track, but it was all bent up. It needed replacing. I wanted something better. Brick, I was thinking. Or cement block. I was intimidated by the cost. I thought about some sort of stucco over metal lathe over plywood. It was the plywood that made me think I might be replacing that in 20 years. If I live another 20 years, I'll be 74. Nope. I